MyDSPi
Open source wireless speakers
The speaker guideline
The playground rules
The initial goal of this project was to build a speaker that match my expectancies in term of usage and sound quality. As previous speaker project I did before, it was the opportunity to challenge myself to go further on project complexity, learn skills on other topics and experiment new process. Enjoy the speaker is important to me but design and make it is even more rewarding.
A speaker is for me, and the people who share the same living space, an object of everyday life that we use, see and interact with. It must be easy to use, and integrate seamlessly my environment. This first requirement has directly lead me to select overall speaker dimensions that would pretty much be around the size of a small shoes box. Based on this size, the overall volume of the speaker would be around 4 liters. On such a small volume, I did not want to integrate a stereo system because it would have had several negative drawbacks. The first one, is that making a stereo speaker with two woofer very close one to the other do not make sense for stereo image. It would definitively sound as a mono speaker on any real use case configuration.
Secondly, share the volume with two woofers would have greatly decreased the equivalent internal volume available for each, which would have limit the low end of the frequency response of the speaker. On the other side, making two speakers to reproduce the stereo image was not that much a problem (as long as they are small and nice enough).
The second constraint of this project was to define the kind of usage expected by the speaker. As a music lover, and listening the radio sometime, it’s all I needed from this speaker. As a result, no need to use this speaker for TV or watching movie, which would have led to different technical choices later. However, since I listen to music, I care (at least a little) about stereo image and the speaker would not necessarily be close to each others, it’s important that they could play music together and wirelessly.
The third constraint was to be able to rely on an already existing and comprehensive music library, that would save me time of creating and sustaining it. Despite it was not a goal to still be able to listen to my old CDs, it’s important that music library was in good enough encoding quality.
One more fourth requirement, which is among the core of this speaker project, was to provide the best sound quality for listening experience, while respecting other requirements in the same time. I used to do speakers that was audio quality driven only. At the end, if it was good looking I was not feeling like having something new or different and most of the time it ended up in another room that where I have the opportunity to listen to music, due to the fact that it did not fit well in the environment. Furthermore, I strongly believe that it’s not worth trying to achieve the best audio quality speaker if you can’t do anything to correct your listening room acoustic. Consequently, I prefer to deal with other kind of constraints and have a speaker I can listen to instead of being frustrated of not having the best I would expect (even if I hope to have the space and money to make a good listening room one day). Nevertheless, I did not want the overall quality being limited by the speaker itself. In other word, it’s not because the speaker can’t go down to 40Hz that the audio quality of the whole system should be limited beyond. In this case, the system should remain open to extensions. As a result, I wanted to keep the feasibility to wirelessly add a discrete subwoofer in the room later.
Last but not least requirement for this project was to make the entire project with tools that are either free or cheap, technically easy to start with and widely available. This would mean that I did not want to make 4 layers buried vias PCB using pro version of any software, or making a design that would need plastic or glass box conceived with the high end CAD software. Contrariwise, I wanted to go as far as possible using free versions CAD Eagle and Google Sketch Up. At the end, I did not want the design to be a halt for the project.
The choices
First investigations:
After browsing all those projects constraints, it came out easily that the Raspberry Pi could be the cornerstone of the project because it’s available, very well supported, cheap and opens a wide range of possibilities. Having already one at home, I could quickly and easily start to investigate project technical choices.
First, I played around with several distributions among very dedicated one for my purpose such as Volumio or Rune Audio. Despite those was pretty much out of the box ready for music playback, it was not that easy to make it work for the wireless connection side between speakers of the project. One of the solution that seemed to fulfill my needs was Upmpdcli with StreamWhatYouHear, but after few hours trying to make it work, it did not proof to be stable enough. In addition, at that time, I had a lot of WiFi connection lost when connecting several Raspberry Pi to my wireless network. It turned out that my internet provider box firmware (Numéricable) was guilty. I changed of internet provider and got better results, but still had stability issues. I then realized that those distribution have the drawback of being simple to use but hard to make it work when you’re noob and try to get something a little off the track.
I decided to keep playing with Upmpdcli and StreamWhatYouHear, which by the way are wonderful projects, with other less dedicated distributions. I picked up a headless Debian Jessie with a MPD server. It was pretty new to me to work with command lines but, finally you get used to it pretty quickly. Also, it was motivating since the result with those software was getting better. Unfortunately, I met issues that I could not solve myself and latency and sound quality was not good enough (several seconds) when using with my computer. Last, becoming a Spotify user at the same time, I could not stream that easily from either my computer or my smartphone. Something told me that the solution was not yet the right one, and I went back on my favorite browser to find something else. It’s at this time that I met Mopidy !
Mopidy, I already heard about be never tested and it did not took long to me to setup and realize that it could provide me Spotify streaming solution easily, from either a computer or a smartphone thanks to plugins like Mopify or Iris. It allows me also to try other content providers such as Google Music but the experience ended up quickly with the latter one because the device management was too restrictive. Last, I wish I could have been able to use Deezer, which was initially my primary choice but they do not open their API to allow that kind of usage.. too bad.
The wireless solution:
I had found solution for having a good, easy to use and stable streaming solution but not yet solved the wireless requirement. I then though that I could manage it with an electronic solution. At that time I was working on the hardware board stack for signal processing and amplification. I was able to add another layer for wireless transmission. I started to study the Texas Instrument CC85XX family data-sheet and its PurePath™ Wireless platform. The more I was learning about that solution, the less I was convinced about the relevance of it. My thought was that I would connect WiFi speakers to a network and use another wireless network to make them talk to one another… I was thinking that it did not make sense and somebody must have worked on a solution. So again, I went back on internet, spent a few hours and found something that seemed to be the smart solution : Snapcast.
After reading the Github of the project, I was wondering if it would be really that easy to configure and work as expected. So I spent a few minutes to test it and it worked so well right out of the box. Even the android app to control volumes was easy. Furthermore, I read that it would keep the latency between speaker less than 1milisecond which is the key to keep a stereo image correct (with a small volume balance). I took the oscilloscope, plugged it to the boards and played sounds. I found that the latency at the stream opening was worse (around 15ms during the first second) then correctly below 1ms and stable all along the playback. Congratulation to the author of this solution which is brilliant !
Here we go, we have a comprehensive audio library, that can be played from any computer or smartphone of my home network; we have well in sync playing speakers with an application that allow to control individual volumes. Moreover, this system is scalable without hard work allowing to get more speakers for subwoofer or multichannel solution.
The remaining part was the electronic side of the project for signal processing (active filtering) and amplification. The choice of the Raspberry Pi as a player led me to a stack conception of electronic boards. The 40 pins header looks like an invitation to make other board above to share data and power supply.
For more information about signal processing and amplification boards design, please refer to the GitHub pages.
Acoustic design
Tweeter:
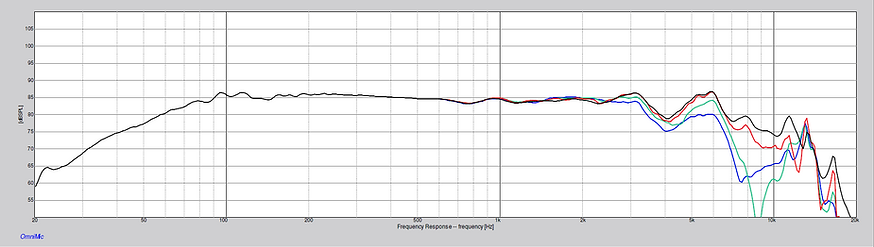
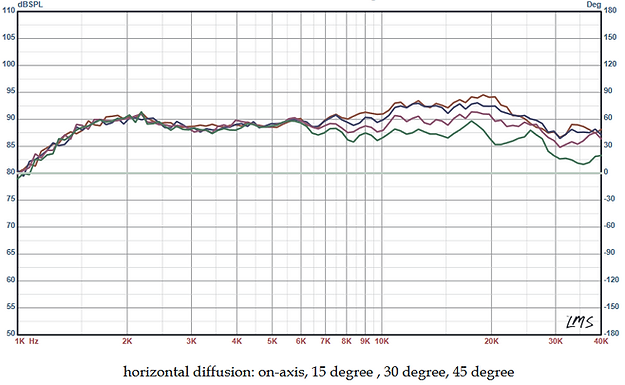
As a matter of taste, I wanted to try ribbon tweeters for a long time and decided this speaker to use this technology for high frequencies. Once the technology decided, I had to find a tweeter that has acceptable price compared to other components of the speaker, nice and fairly flat frequency response and able to go down low enough to create a crossover with the woofer at reasonable high frequency (around 3kHz). Having said that, there were not that many choice left but one did seem to match : the Fountek NeoCD 1.0. If the supplier recommend to use above 3.5kHz, it turned out to be acceptable to cut it around 3kHz with pretty steep crossover (Linkwitz-Riley 24dB/Oct). Also, it has a on axis frequency response that is within +/- 2.5dB from 3kHz to 20kHz, which is acceptable and a good sensitivity of 90dB/1m/2V which interesting when using amplifiers without heatsink for space saving,as I do. Last, its price below 50€ is acceptable for this project.

Woofer :
The woofer choice was more in regard with technical constraints of the speaker, and mainly because internal volume was pretty small due to outside speaker dimensions but also space taken by electronic boards and speaker motors. At the end, I estimated having only 2.8 liters left. More over, the woofer choice needed to comply with the overall frequency response expected, which needed to go down enough (let’s say around 80 Hz as a corner frequency without high trade-off on efficiency) and no high peak around the crossover frequency with the tweeter (below speaker break point). Also, dimensions and price constraints of the project do remain true for woofer choice and was among primary filters of the entire speaker list available.
From experience, I knew that Neodymium motor based speakers could provide me good efficiency, good lower frequency response on a small volume. I looked into those ones and found the Dayton ND105 model which was perfect for my needs. It’s 4 inches speakers with low VAS of 1.97 liters, high BL factor of 4.52 Tm and acceptable SPL of 86.8 dB / 2.83V/1m. It’s resonant frequency is given for 78.7 Hz which sounded to me as workable for to get my 80Hz with larger internal volume than VAS.
Passive radiators:
Acoustic enclosure design was first oriented toward a ported vent. Simple to build, it shown a major drawback of reducing the internal volume which was, as explained previously, already low. It would have made the bass response even more difficult to extend One solution to get rid of this cons was to use passive radiators instead. It’s suitable for this kind of small speakers as it does not reduce the internal volume at all. Unfortunately passive radiators are not so easily available on speakers shops and are most of the time really expensive for what it’s. However, making one is very easy, by removing the motor of a well chosen speaker. For this, I picked up Monacor SP84 for its very low price and removed the motor. It has the benefits of keeping the speaker spider which play an important role in the stiffness of the passive radiator. Also, removing the motor allows you to use the inside of the voice coil to load weight and tune the passive radiator. For this speaker, I used two passive radiators located on the side of the enclosure to keep the rear face as clean as possible and hide them more easily. I used 10g weight in each to tune them using coins which have size just smaller than the voice coil radius. This way I was able to control easily and precisely the weight.